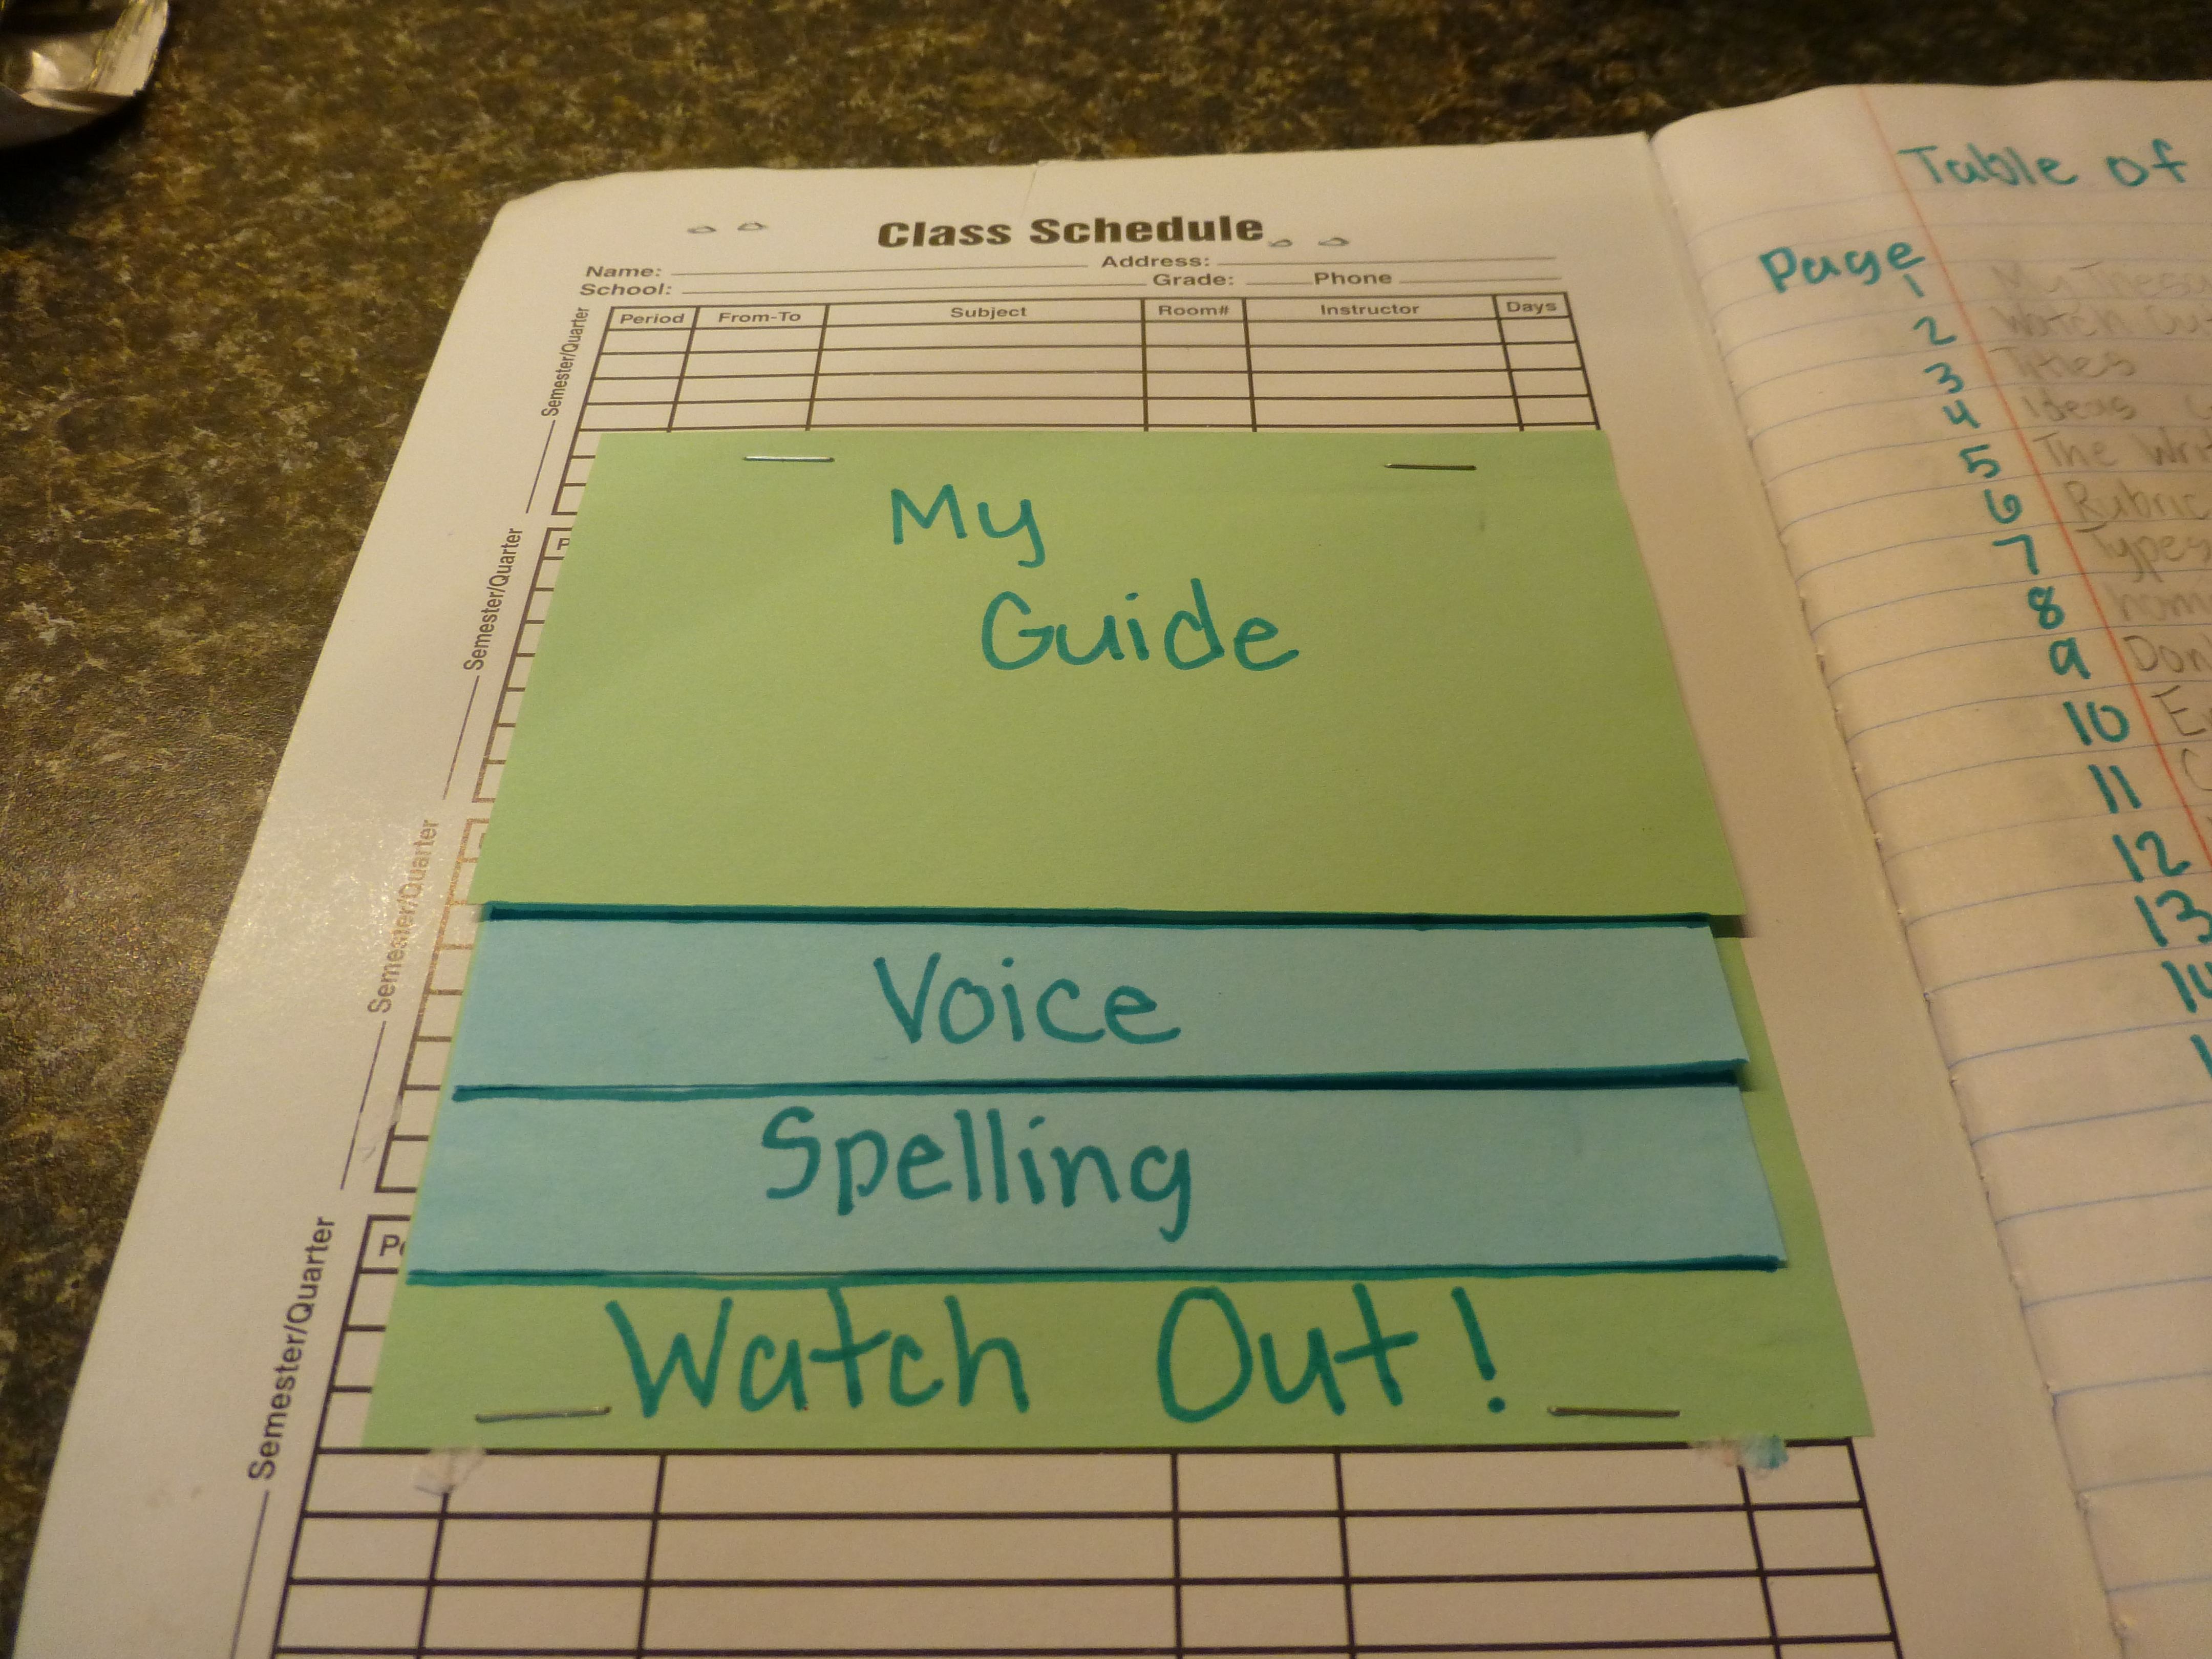
0

Final Draft

Once the rough draft is complete, I let my students borrow a Smencil to use for the final draft.  They look forward to this small reward for making it all the way to the end.  On the day of the real test they will use a regular pencil.

smencilsA word of caution is to be given about time management.  Typically, the multiple choice  section of the STAAR should take about 30 minutes to complete each day.  That leaves 210 minutes left to compete the entire writing process, plenty of time.  But some students are especially slow and may not be able to finish on time, so I train them to be aware of the time.  Once I call the time at 30 minutes left they need to stop working on the rough draft and write the final draft.  Once I call 10 minutes left, they need to stop writing the final draft and write the conclusion.  I am convinced that a paper without a conclusion will not score well. (my opinion)

Occasionally you will have a student with test anxiety, and he will panic with writer’s block.   Last year one of my students made me a nervous wreck because of this exact scenario.  He sat with his pencil down for 3 hours and finally picked it up during the last 30 minutes.  There was no time for a rough draft, only the final draft.  Children are unpredictable so the more you prepare your students for testing day, the better.  Prayer helps a lot too!


0

Revising and Editing the Rough Draft


This step in the writing process, in my opinion, is where the rubber meets the road so to speak.  I think the time your students spend on revising their rough draft could be the difference between a passing and failing grade.  The trick is to  help the student to never be satisfied with what was originally put down on paper, to find the imperfection and make it better.  Our goal is to cover that rough draft with RED.  On the day of the test, we will use red pencil, but for everyday practice we use red pen.

I think the time your students spend on revising their rough draft could be the difference between a passing and failing grade. The trick is to help the student to never be satisfied with what was originally put down on paper, to find the imperfection and make it better. Our goal is to cover that rough draft with RED.

Step one is to read the rough draft using a phonics phone, looking for mistakes and searching for missing words while circling all periods and underlining the capital letter at the beginning of the sentence.  This forces them to see how many sentences they have included in the paragraph.  I require at lease five sentences per paragraph.  This helps those students who refuse to put periods.  By the time the test rolls around, I rarely have problem with periods because of this step.

I think the time your students spend on revising their rough draft could be the difference between a passing and failing grade.  The trick is to  help the student to never be satisfied with what was originally put down on paper, to find the imperfection and make it better.  Our goal is to cover that rough draft with RED.


If a student cannot find many mistakes, I will match the writer up with another more advanced writer for peer editing.

Step two is to use the Thesaurus or word walls to add trophy words or additional examples and explanations.  The checklist is helpful during this step also.  I will not let them write the final draft until I see lots of RED!

I think the time your students spend on revising their rough draft could be the difference between a passing and failing grade.  The trick is to  help the student to never be satisfied with what was originally put down on paper, to find the imperfection and make it better.  Our goal is to cover that rough draft with RED.

I am excited to share The Battle Bunny with you.  The book is perfect for teaching this skill.P1030182

P1030183P1030185

Teaching STAAR writing is not paid to endorse any ad or product.

0

Rough Draft

Writing the introduction and the conclusion is the first order of business once the pre-writing is finished.  I instruct my students to use the back of the pre-writing page and draw two lines, one near the top, and one near the bottom.

P1040248The introduction should grab the reader’s attention with a sound word, a question, voice or some kind of emotion.  It also needs to include the setting and most importantly the key words from the prompt.  In this example the key word was choice.  After the introduction is complete make sure the first K on the checklist is checked off.

Most good conclusions have some kind of ending emotion and reflection.  Don’t forget the key words and to check the second K off of the checklist.  In the example my student changed the word choice to decision which is perfectly fine if the student  is capable of picking a synonym.  Did you know that the Weirder School Series ends each book with the words, MAYBE? Maybe… is a great sentence stem to use for reflection, as is Next time…,  I hope…, or  I’m glad…

P1040252P1040253

After the introduction and conclusion have been written, it is time to use the pre-writing bubble map to complete the rough draft.  I tell my students that it is okay to cut the last paragraph short if they run out of room, but NEVER okay to cut out the conclusion.  ALWAYS make room for the conclusion.  As you may have noticed, I do not let my students use lined paper for the rough draft.  They will not get lined paper on the day of the test, so I want them to practice without lines.  Some may need to get used to writing smaller in order to fit all three paragraphs in between the introduction and conclusion.

I am constantly moving around the room making sure each step is followed.  I use a “Way to Go!” stamp on the pre-writing page to indicate to myself that my student is ready for the next paragraph, and that way I am not rereading something that I have already seen.  I also write myself a note in the margin that might say, “conferenced 12-10.”  Once I am sure that a student is consistent with following the pre-writing, then I let certain ones give themselves a stamp, so I can concentrate on the others that need more help.

In my next post I will discuss using revising and editing on the rough draft, in my opinion, the most crucial part of the process.

P1040106

checklist


0

Pre-Writing Using the Checklist

 Expository Pre-WritingCobwebs 1

After the Writing Checklist is complete on the prompt page (see above) it is time to begin pre-writing.  Click here for the checklist post.  I instruct my students to use a bubble map, one circle for the center main idea, two for the top (Mickey Mouse ears) and one for the bottom.  The outer circles will be for the topic of each paragraph.  The numbers 1-5 will be for the checklist.

This graphic is for a three paragraph essay.  I always tell my students that if they run out of room on the final draft to make it a two paragraph paper, as long as there is room for the conclusion.

Pre-Writing

I have included one of my student’s essays from 2014 that received a 8= Accomplished score for you to look at. Notice every number five on the bubble graphic is voice.  Trophy words can be placed on the tops of the bubbles for those who have a good grasp on the language.  The remaining blank numbers should be filled out with rest of the checklist.  Students check off each item as it is used in the pre-writing.

Pre-Writing

As my students write the rough draft they are constantly referring to the pre-writing and checking off each item as they write. I also tell them that it is okay to have more than one of the items in the composition.  They might add these when they revise and edit their paper.  For example, the enclosed composition has several similes and sentences with words in a series.  Just don’t put them all in one paragraph.  See my post for revising and editing the rough draft

5


0

The Expository Prompt

Once the seal is broken and the prompt page is opened, it is time for your students to turn on the auto pilot, using the training instilled over the months before. The first order of business, after the multiple choice have been completed, is for your class to locate the word WRITE within the lengthy prompt.

Once  the seal is broken and the prompt page is opened, it is time for your students to turn on the auto pilot, using the training instilled over the months before.   The first order of business, after the multiple choice have been completed, is for your class to  locate the word WRITE within the lengthy prompt.  They should then circle the entire sentence then locate KEY WORDS within the sentence.  These key words must be used in the introduction (I) and conclusion (C).  Now remember, my advice here is for At Risk kids. Gifted students could rework these key words into creative synonyms, but those with language issues need to stick with the words given to them.  This strategy will help them stay on topic, and if they stray, at least the introduction and conclusion will bring them back on point.


The next item my students write on the prompt page is the WRITING CHECKLIST, of my own creation.  I can’t stress how important this checklist is to success. You can find it here.

Expository prompt

Lastly, begin the writing process with BRAINSTORMING at the bottom of the prompt page. My students are required to write PICK ONE next to the words brainstorming.  Number from one to three and get busy.  Circle the one you can write the most about.  Remember to not write a city, state, or country in the brainstorming.

Expository prompt

After the prompt page is completed, it is time to find the blank page provided in the test, and begin pre-writing.  Read about pre-writing here.


1

A 4th Grader’s Writing Journal

P1040049

Our district emphasizes research based strategies for learning.  One strategy I use on a regular basis is note taking in our journal.  The journals become a lifeline for a confused 4th grader, overwhelmed with nonsensical English rules.  My students use this resource every day for EVERYTHING.  Allow me to introduce you to the LeBlanc style of journaling.

P1040061

Inside the front cover of our journal, you will find a foldable with three sections:  voice, spelling, and WATCH OUT!  These sections are filled out by me as I circulate around the classroom, or conference with a student.  If a student is heard using voice properly, or it is written in his paper, I will add it to the voice section, and will give bonus tickets (my classroom management system) for correct use in a composition.  The spelling section is a place to write common words that my At Risk students find challenging.  For example I might write, “Use WHEN not WEN.”

P1040036The WATCH OUT section pinpoints areas each particular child is struggling with.  I expect my students to constantly refer to these pages as they write.

P1040064

Next is the table of contents, extremely important for locating those crazy English rules.  (and some Leblanc tips also)

P1040072

I am a happy teacher when I hear these pages flipping, and flipping during writing time.

More sample pages… We use markers and highlighters.

P1040077

P1040078

P1040079

P1040076P1040075

P1040071

P1040073

2

20 Ways to Rein in Runaway 4th Grade Writers

WATCH OUT!

The WATCH OUT! phrase is used with my students to indicate trouble.  As I read their papers I write WATCH OUT when I see a place that needs to be edited/revised.  There is a special place in each student’s journal to place an individual WATCH OUT problem.  (I will focus a future post on journals.)  This list is based on years of watching “at risk” children and their writing trends.  Perhaps you would not need to be so stringent with a gifted writer.

P1040041

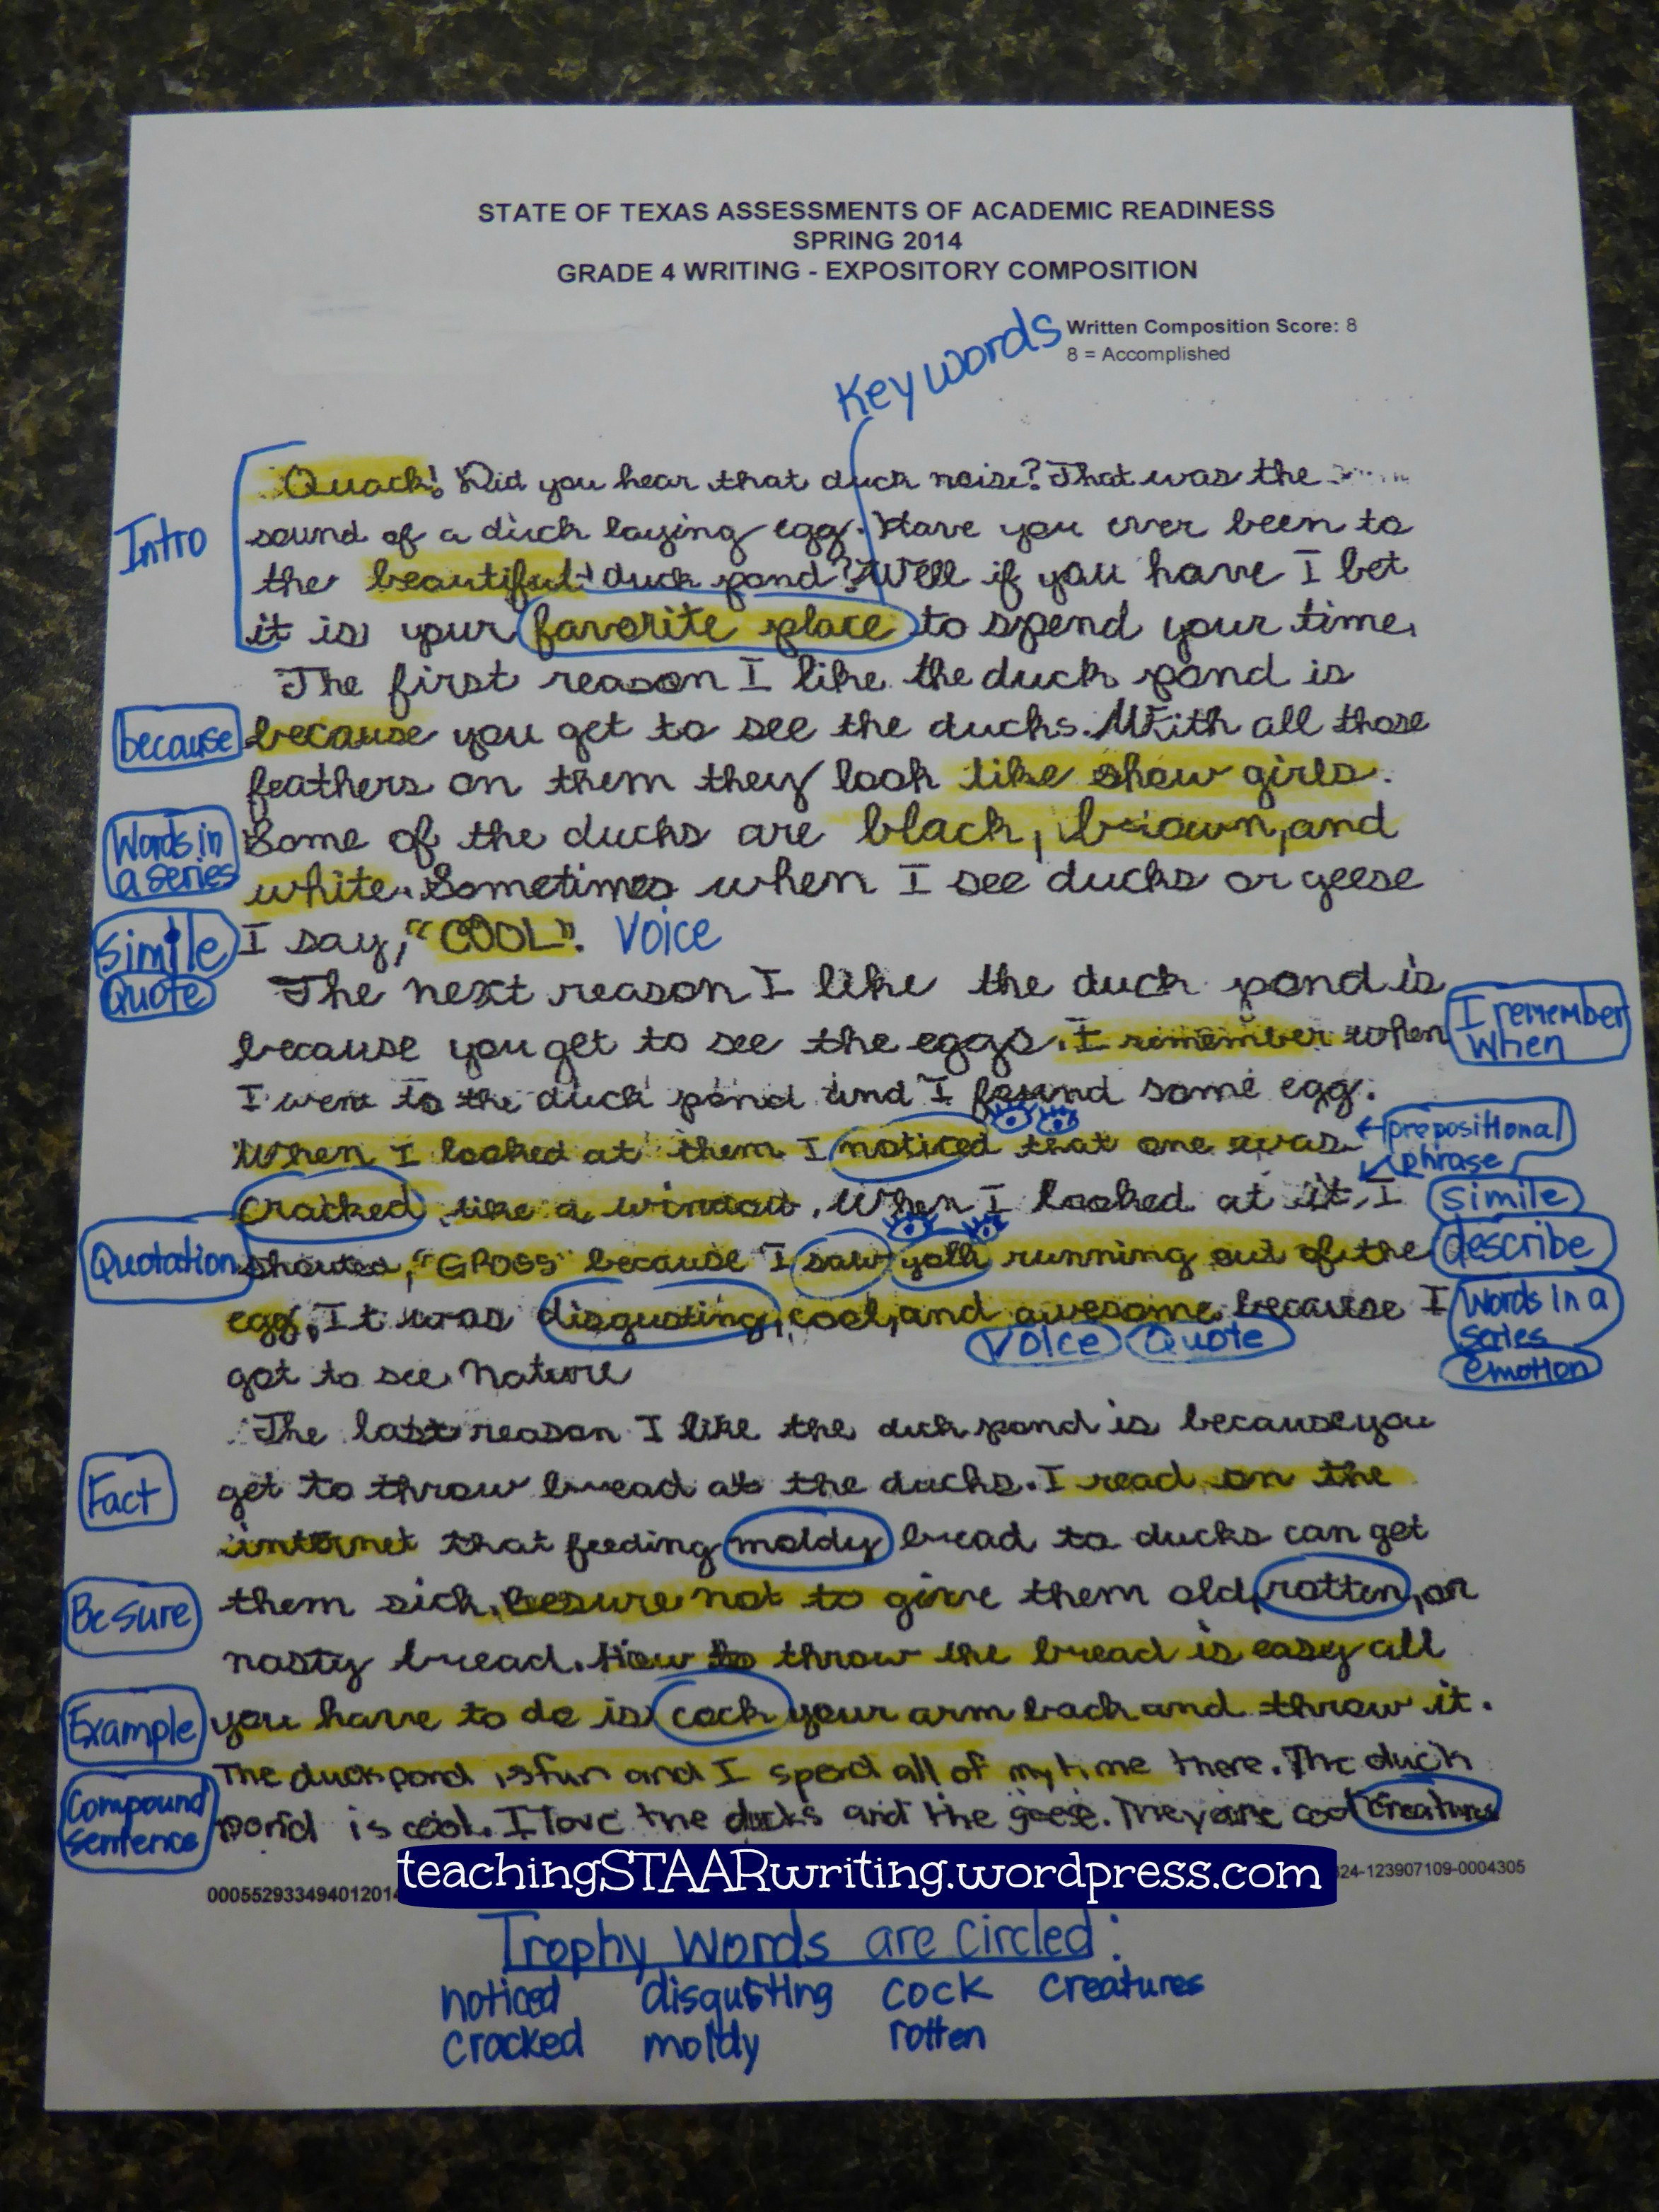
1.  DON’T CHANGE EMOTIONS IN THE NEXT SENTENCE  Writers that want to fill up space try all kinds of tricks.  I tell my students that I would LOVE for them to start off with an emotion like worried, and then at the end of the composition change emotions to proud or relieved.   This type of discussion is perfect for reading comprehension where the character often changes from the beginning of the story to the end, but NEVER in the next sentence.  There needs to be lots of explanation between emotions.

2.   NO VIOLENCE OR BLOOD  Boys especially may want to write about video games, or interactions with friends.  This rule also keeps fiction from creeping into a personal narrative.

3.  DON’T START A SENTENCE WITH BECAUSE.  I don’t know why my students want to capitalize the word because and put a period in front of it, when it is clearly in the middle of a sentence.  This mistake happens frequently.

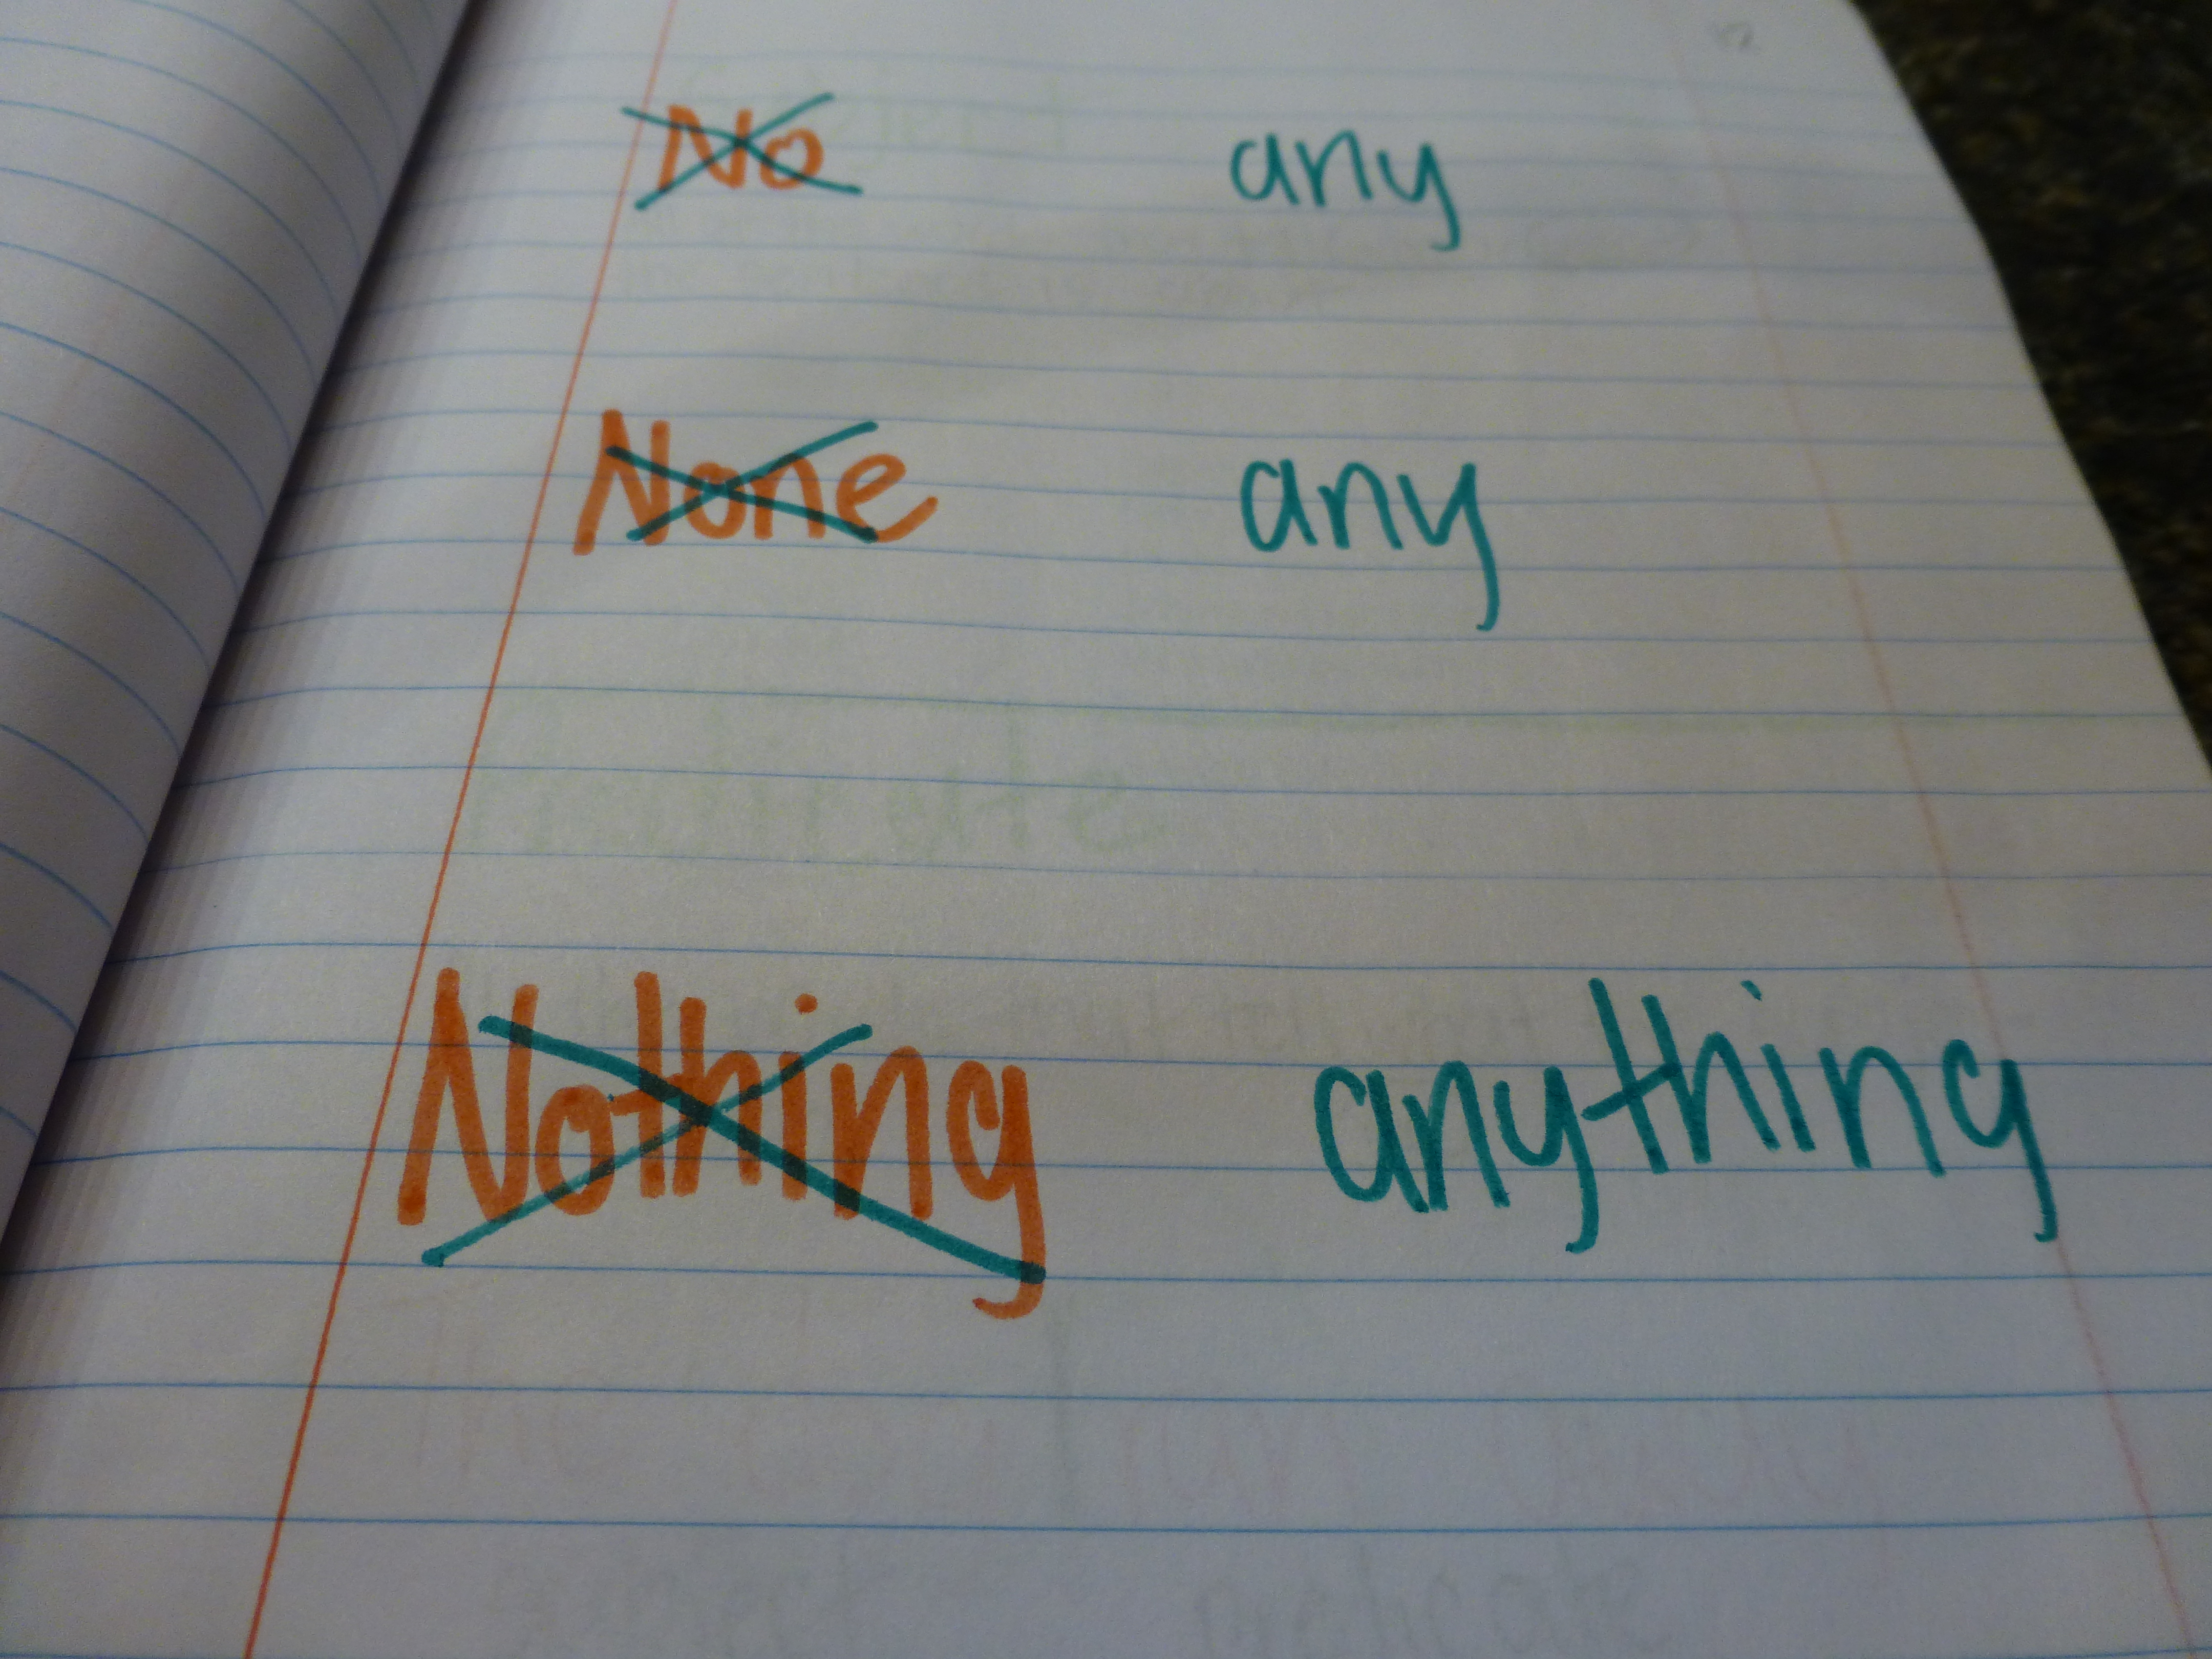
4.  DON’T USE “OK”, “YES”, “NO”  which would indicate boring dialog with another character in the composition.

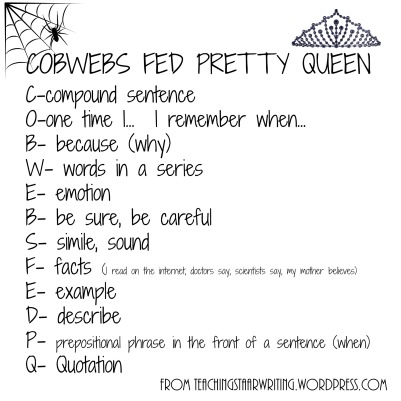
5.  NO BACK AND FORTH CONVERSTIONS (forgot to take a picture of it)  This goes with rule 4 and 14.  This is a trick to take up space in the composition instead of answering the prompt.  Most of the time these conversations are boring and off topic.  I allow my “at risk” students one quotation per paragraph, and only if it is interesting and only if they use proper punctuation, and only if they are the one making the comment.  This is on a case by case basis.  I would rather their quotation be a reflection.  For example:  I said to myself, “You are one smart cookie!”

P1040042

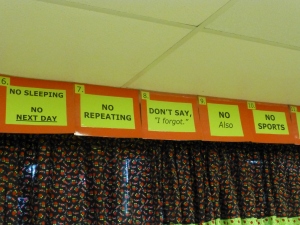
6.  NO SLEEPING, NO NEXT DAY  Another trick students will use to try and fill up space.

7.  NO REPEATING  This goes hand in hand with combining sentences, perfect for revising and editing on the multiple choice section of the STAAR.  Example:   My dog is so funny.  My dog is my best friend.  Combined it would read:  My dog is funny and is my best friend.

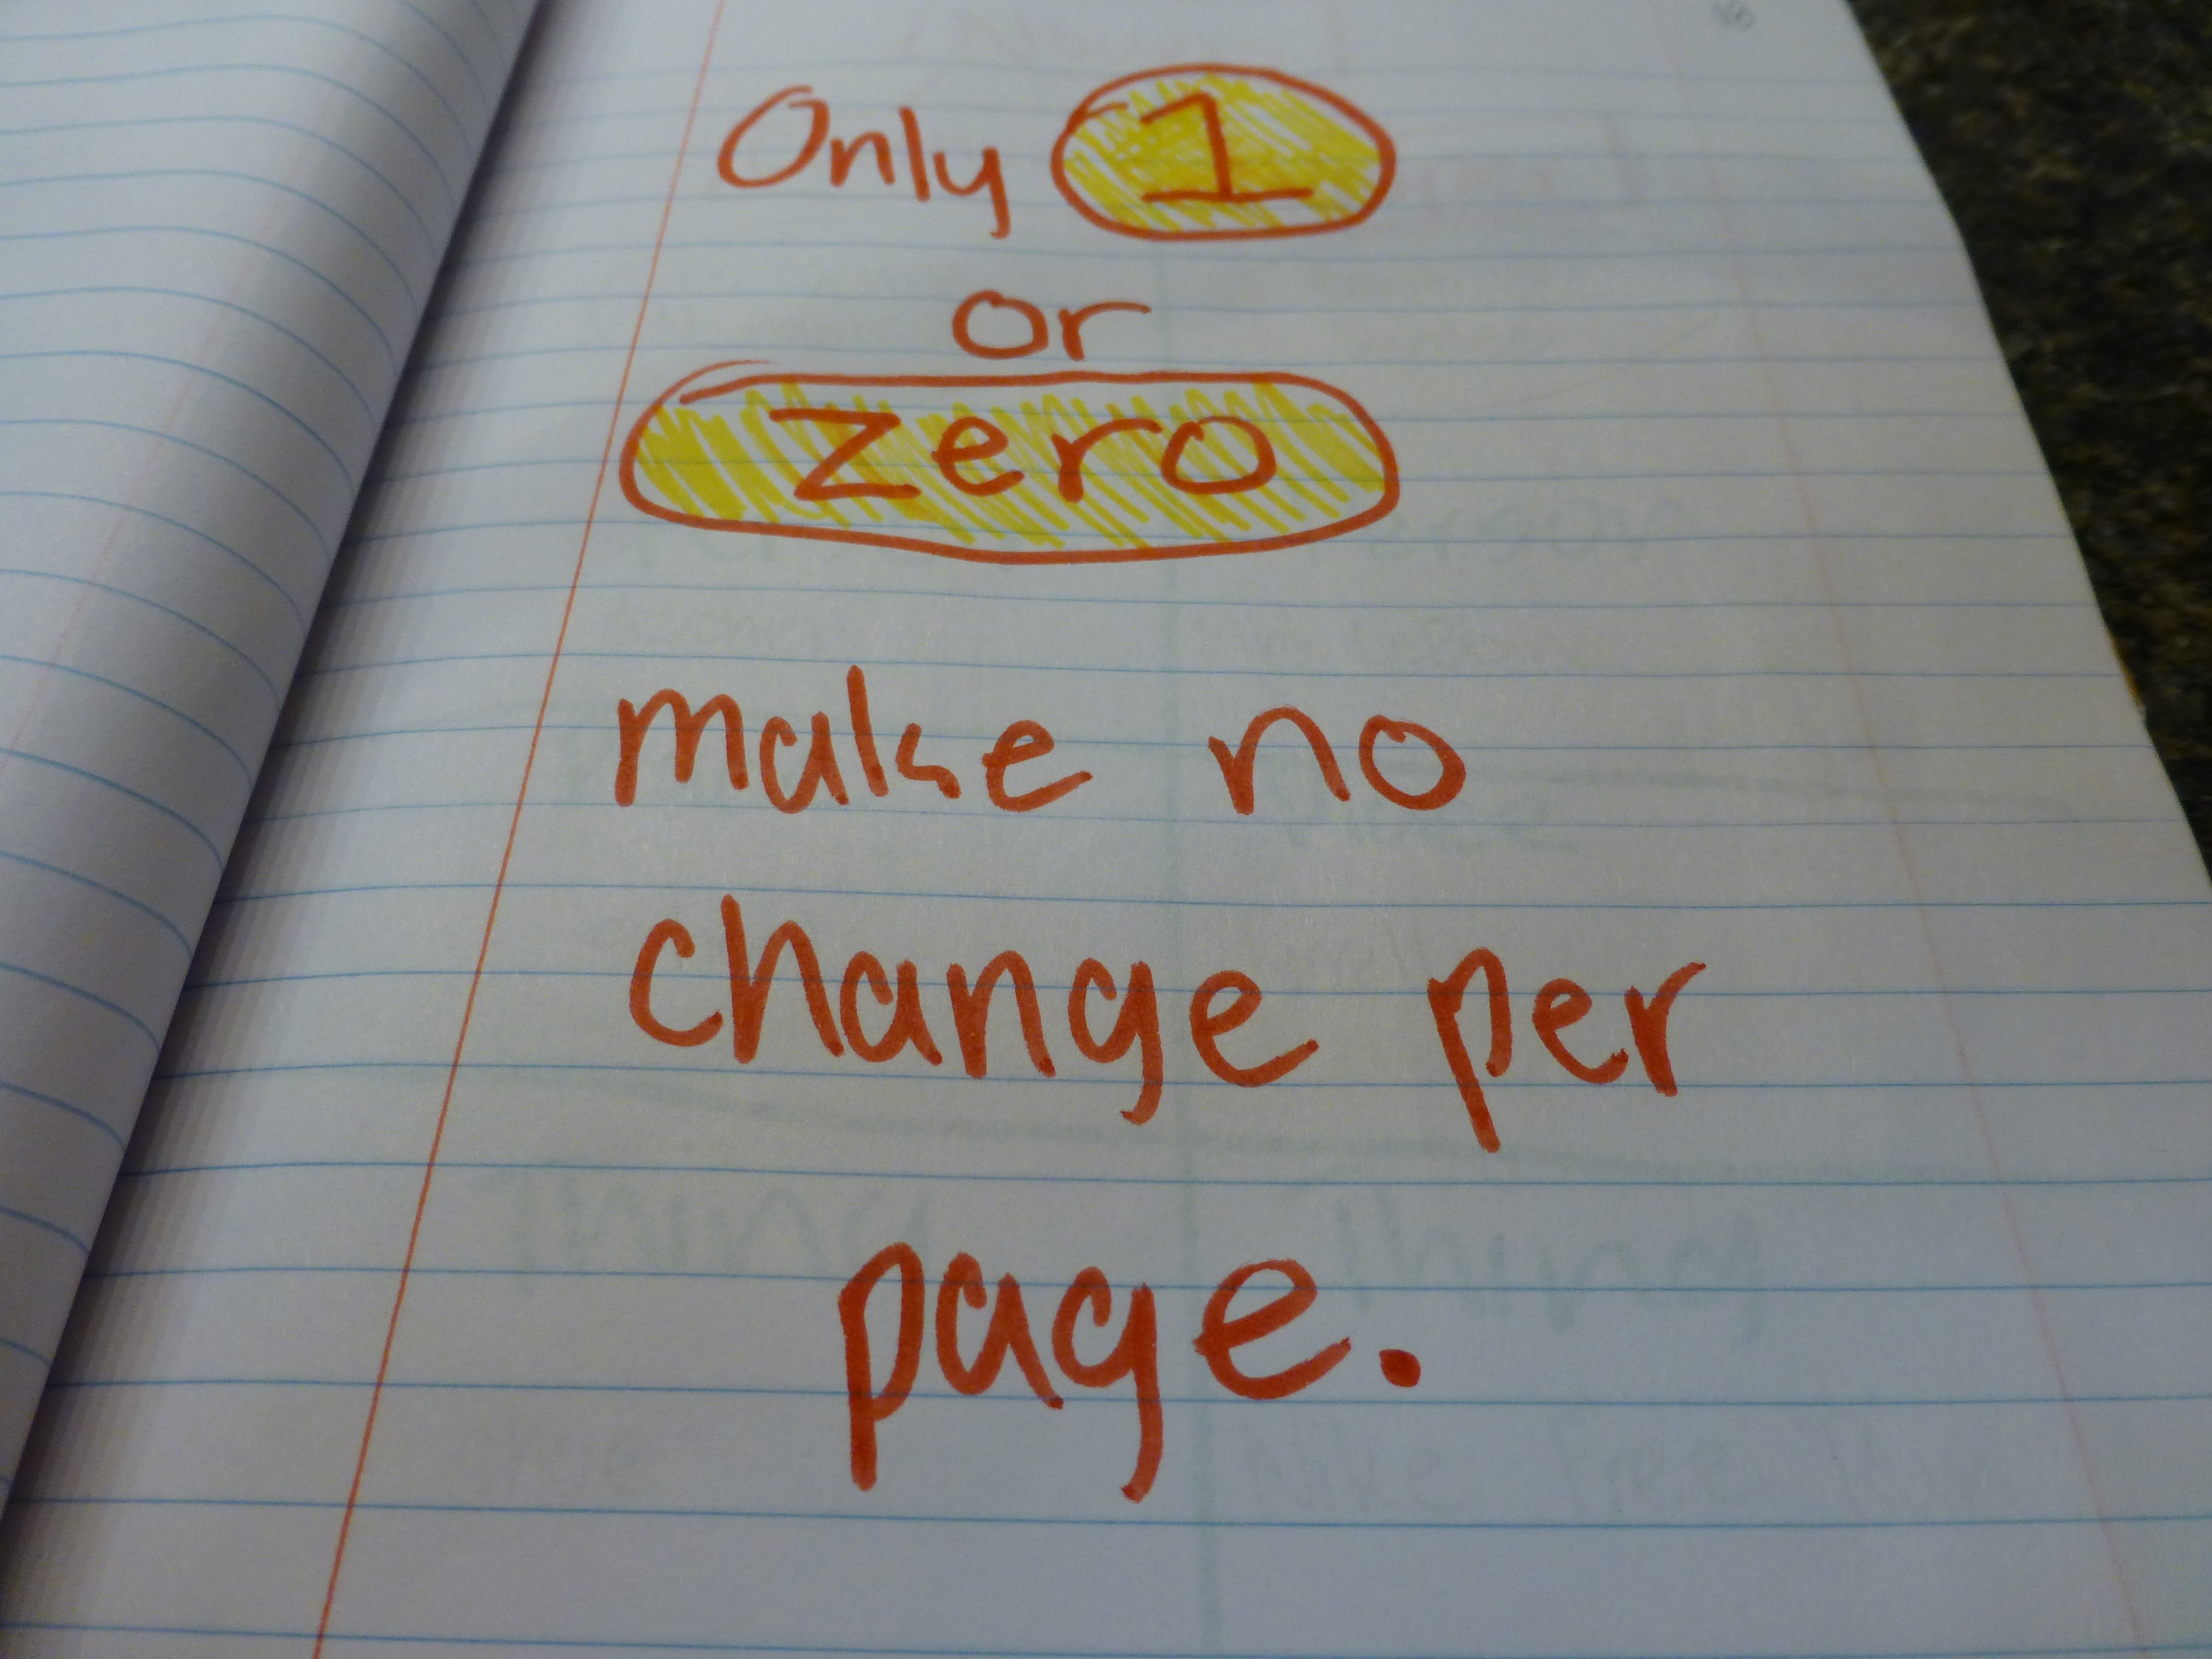
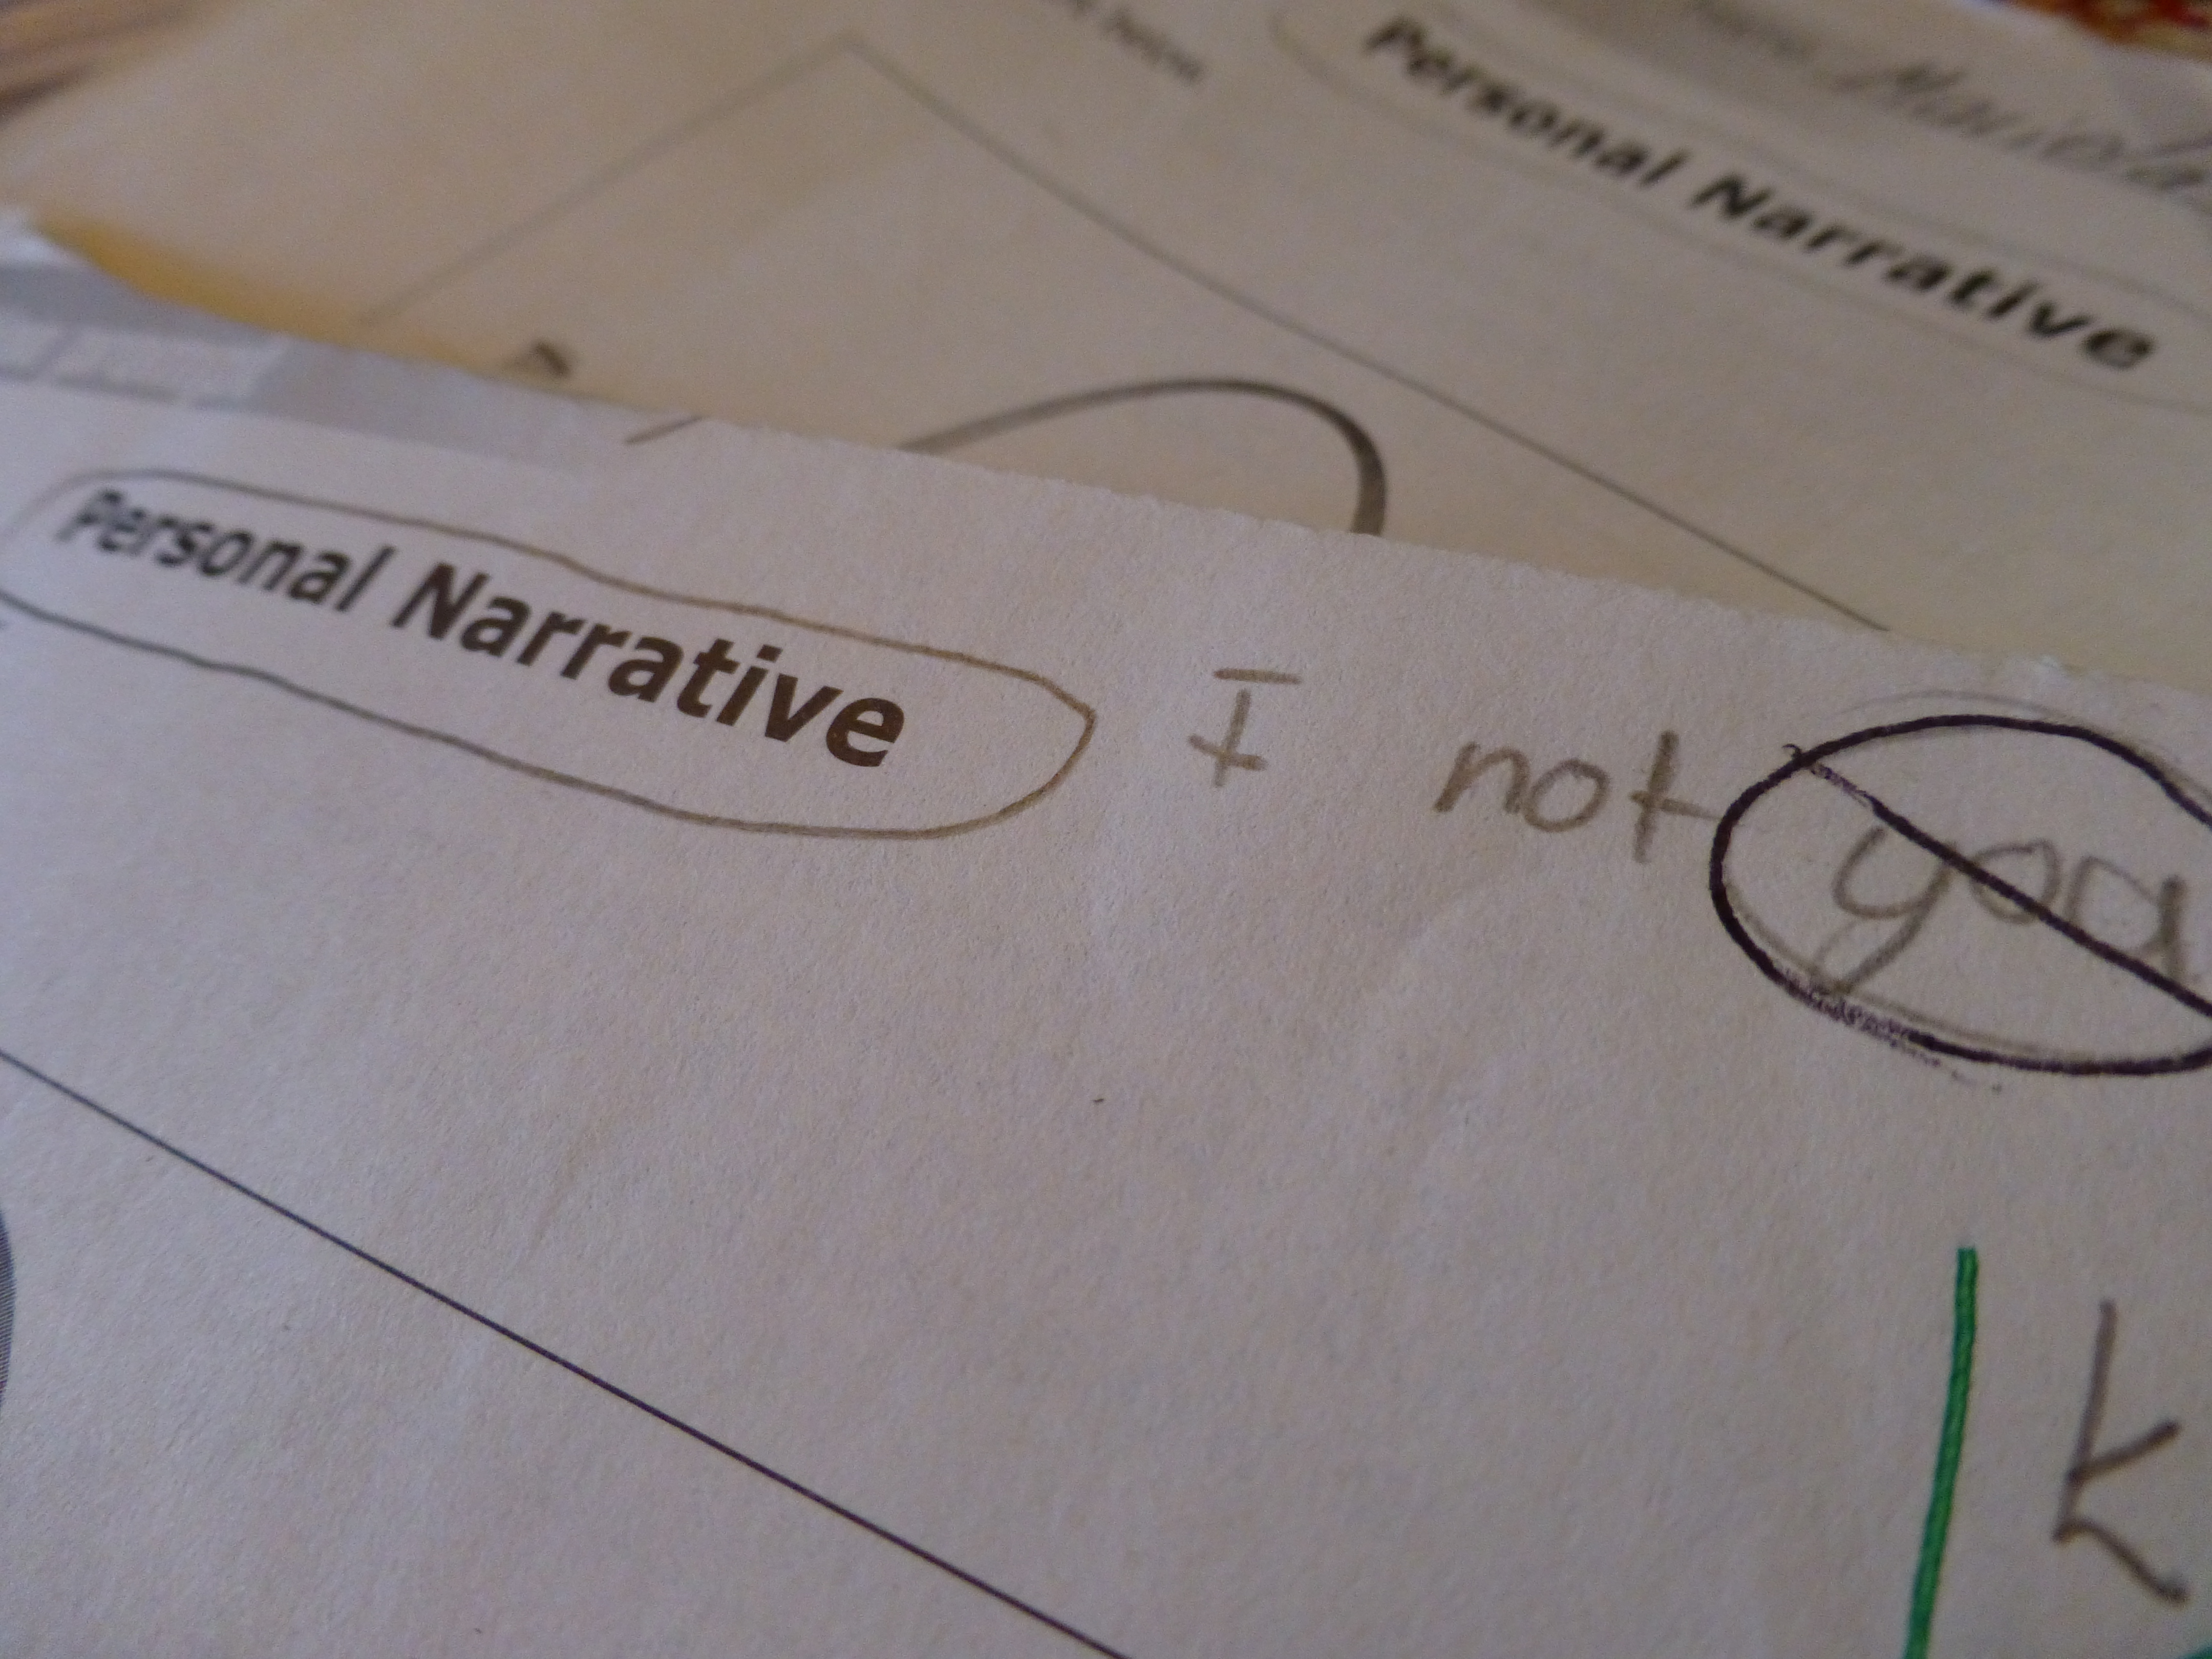
8.  DON’T SAY ,”I FORGOT” see below

9.  DONT SAY, “ALSO”  Both number 8 and 9 are to prevent the writer from tagging onto the end of their story two or three sentences just to make the composition longer.  It would be best to use the red pen during revising and editing and place the sentences where they would go when the final draft is made.

10.  NO SPORTS  see below

P1040043

11.  NO VIDEO GAMES  Typically “at risk” students who write about sports or video games as a personal narrative are unsuccessful because they turn the composition into a list.  If the prompt says to write about a favorite sport or game then I teach them to write about one moment in the game, not try to explain how to play the entire sport.

12.  NO FICTION  I really drive home the point that whatever a student writes about must be believable or have been experienced personally.

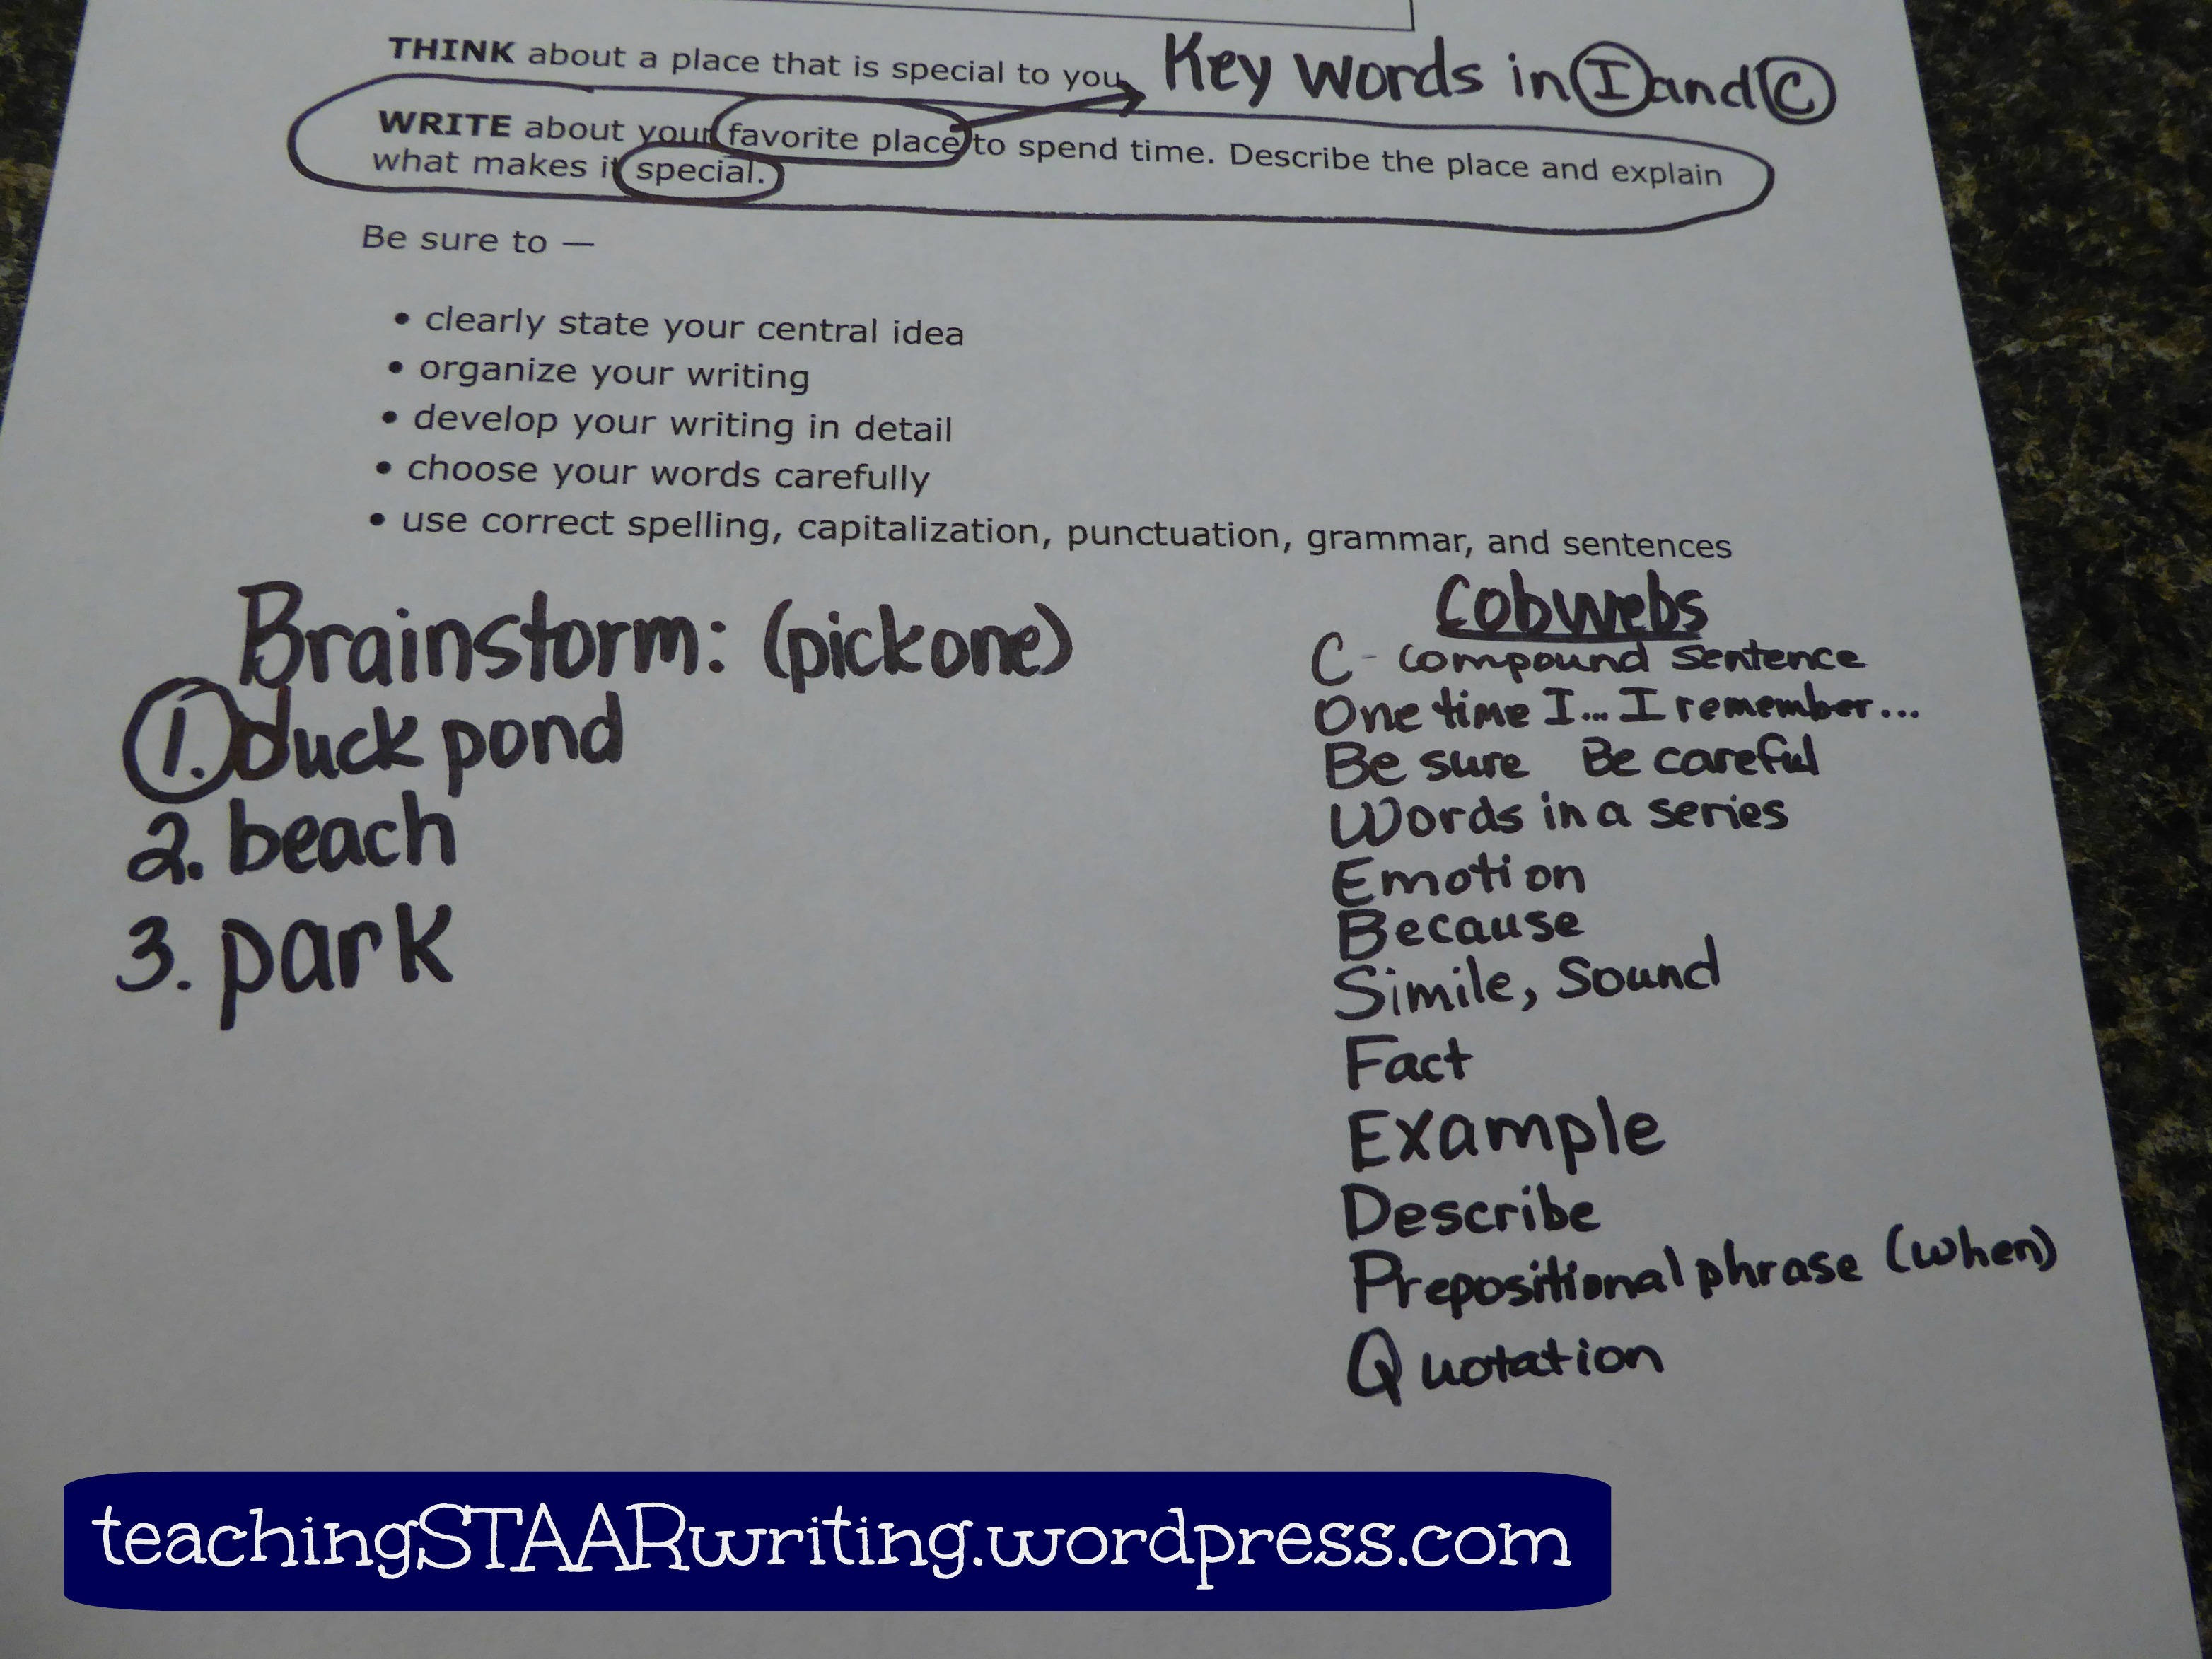
13.  NO PREWRITING WITH COUNTRIES, STATES, OR CITIES  Often my students will want to put Mexico or Galveston  as their response to the personal narrative prompt.  This is way too broad, and normally the student’s composition will resemble a list.  I tell them to pick one place they went in these locations. Then pinpoint a moment in time, like a snapshot from a camera, to write about.  I will discuss prewriting in a later post.

14.  NO MOM, DAD, BROTHER, SISTER, COUSINS  This WATCH OUT rule is one of the most important on the list.  Typically my “at risk” students do not have many experiences other than family.  If not reined in, a student’s composition would be filled with boring conversation, and exploits of family members.  I allow them to mention a family member ONCE, but then the rest should be written in first person about self.

P1040044

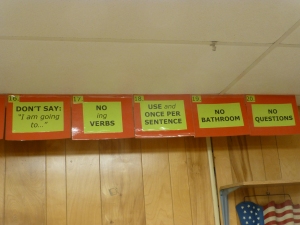
16.  DONT SAY, “I AM GOING TO…” see below

17.  NO ING VERBS  Both 16 and 17 are to help the student write the composition in past tense.  ESL students especially have a problem with past tense.  As they acquire the English language this gets easier, but it helps to have a rule in place.  Sometime this helps them when revising and editing.

18.  USE AND ONCE PER SENTENCE  This goes with rule number 7.  New writers love to fill the composition with one continuous sentence linked together with and.

19.  NO BATHROOM  No references to anything in the bathroom, bathroom words, or bodily functions masquerading as voice.  Once again, this is a trick to fill up space.

20.  NO QUESTIONS  It is okay to use a question in the introductions, but questions are frequently used by students when talking to a family member.  (see rule 5 and 14)  This is another trick a student will use to fill up the page.

Now here is the fun…I let my students have one last HURRAH after teaching these WATCH OUT rules.  I let them write a composition with all the above…a one time occurrence…to get it out of their system.  They have such a good time and produce such funny stories.  This proves to me that they understand what I expect in their writing.  I let them share the stories in their groups and then these wacky compositions  mysteriously “disappear.”  (I am not sure the parents would understand stories about blood and bathrooms. hahahaha)

So what can you do to help your student fill up a paper with quality sentences?  Check back soon for a post on the writing process checklist that I have created with all the ingredients to make a great composition.

0

Essential Posters

P1040039

Naturally the WRITING PROCESS is front and center in my classroom.  At first I am constantly guiding the students through the writing process by visually referring to the posters.  With continual use, the writing process is easily memorized.  Notice that I have a red pen taped to revising and editing. 

P1040040

The red pen is a reminder that revising and editing is done in red.  After each child has finished the rough draft, I teach them specific steps for editing.  I will discuss this more in a future post.  We also use red pen when practicing revising and editing on the multiple choice passages.  On the day of the STAAR test, we will use red pencil instead of pen.

P1040045The WRITING IDEA poster is helpful for students with writer’s block, or with limited experiences.   

P1040046

My definition of VOICE is to tell my student writers to fill their composition with kid language. I listen constantly to the students interact with each other and add to our VOICE wall.  Just last week I heard a child say, “She’s a rock star!” and another say, “He wrote like a boss!”  These expressions will soon be added to my wall.  This is just another tool to help my reluctant learners come up with language for their compositions.

0

Tools I Can’t Live Without

journals

The journals we create in class are used daily as reference tools.  I will have another post later about the contents of our journals.  The markers are a fun touch, so the journal writing won’t be so boring.  (I am a bit of an artist at heart)  And the red pens are for revising and editing.  On the day of the STAAR we will use red pencils, instead of the pens, to revise and edit.

P1040047

I found these trophies at a garage sale and unscrewed the football or ballet dancer off of the top so they would be generic.  I emphasize TROPHY WORDS constantly in class.  If I hear a student use a trophy word in conversation or in a composition, they get to have the trophy on their desk for the day.   I tell them that the STAAR test cannot be passed without lots of trophy words.

P1040048

My megaphone was the best $15 I ever spent at the BooksAreFun display in our teacher’s workroom.  You can see that it is small compared to the Expo markers and runs on batteries.  Students love to read snippets of their compositions or anything else we are focusing on that day into the megaphone.  If you GOOGLE “mini megaphone”  you will find something similar that you might be able to use.

0

The Possibilities are Endless

Welcome to my new blog about teaching writing to a difficult to reach group of kids.  On this site you will find ideas to help you and encourage you.

My name is Cindy Leblanc and I have been teaching for over twenty years and am ESL and GT certified.  My assignment last year was to teach writing to all the fourth graders at my school, around one hundred or so, most were labeled “At Risk”.  My results came in way over the state average, thanks to the Lord.  One disclaimer though, I had only a  few “advanced.”   The things I share on my blog will be helpful for those of you who teach children who do not have a handle on English, whether from another country, or natives who simply are not exposed to proper in English in their homes.  My ideas are not designed for the gifted and talented, although I will address this group from time to time.  My goal is to show you how to help your class PASS.

The things I do are not intended to be controversial, but some may not agree with the structures and parameters I use with my students, and that’s okay.  But this is not the place to argue about it.  The thing I love about English grammar is that with enough repetition, everyone can master the rules and become a decent writer.

You is the best

No, really!